
This Nuts and Bolts session focuses on integrating the newest technology with word processing.
Let's get started. Part 1: Getting images
Start Netscape (Duh! You must be there to be reading this.) and go to the following link:
http://www.clipartconnection.com/mainframe.php3?page=science.htm
This is the famous ClipArt Connection. Select a category from the list at the right and about five images, called gifs or jpegs will come up in the window to the right. Click and hold (Mac) or right click (PC) on any image, and you'll see a window pop up where you can choose to "Save Image As...". Click on that selection and save your image in your designated folder. Now you've got an image in your folder that you can use on your document. You can even add animated images to a HyperStudio stack or add gifs or jpgs to your Power Point presentation. Wow! Go get about a million of your favorite images.
The Animated GIF Collection is another great place for images. Just click and hold or right click 'til you drop. Don't forget to save everything to your folder. You can even take the BACK gif at the bottom of this page if you want.
By the way, GIF means Graphics Interchange Format and JPEG means Joint Photographic Experts Group (great bunch of guys to party with). These are geek terms for image compression, and it's the way graphics are recognized by HTML code. Most of the time, you need to use lowercase letters followed by a dot and the initials gif or jpeg (jpg) in order for internet servers to recognize that you've got a picture on your web page. If you're using Windows, the .gif or .jpg is placed there for you.
Well, we're having fun now! Let's get some backgrounds for our documents. Go to Roger's Background Gallery and do what you do best. You got it. Just click and hold or right click the image you like. Save it to your folder.
Part 2: Putting images on your page
If you want to try this using Word 97 (PC) or Word 98 (Mac), the first thing you need to do is to create a new Word document. Create a document, put a title on it and "Save As ...". Make sure you save in an appropriate folder or directory.
Next, go to the "Insert" menu option and select "From file". There's a little image that looks like a tiny picture of a mountain (at least that's what I think it is, but I wear bifocals). That's the icon that allows you to add a graphic. If you can't find it, don't worry about it. Just click on "Insert => Picture => From file..." and the Insert Picture window appears prompting you to select a picture from a folder you know is yours. I've inserted this little gif in just that way, and I've centered it on the page using the centering icon on the tool bar.
If you want to do this using AppleWorks or ClarisWorks, create a new document, put a title on it and "Save As ...". Make sure you save in an appropriate folder.
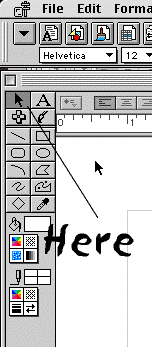
Next, open the tool bar (if it's not already open) by clicking
on the icon at the bottom, left corner of the page. It's the Tools
icon, and it's to the left of "Page 1" (or Shift, Command
T) .![]() When the tool bar opens, select
the arrow icon at the top of the tool bar. That's the graphic
icon. It allows users to insert a floating image as opposed to
an inline image. Then simply select "File" and choose
"Insert...", choose the image you want, and click "Insert"
from the window.
When the tool bar opens, select
the arrow icon at the top of the tool bar. That's the graphic
icon. It allows users to insert a floating image as opposed to
an inline image. Then simply select "File" and choose
"Insert...", choose the image you want, and click "Insert"
from the window.

If you want to try this in Netscape Composer,
simply go to the Communicator menu option and select Composer.
You can also open Composer by clicking the icon at the bottom,
right corner of the page. ![]() When Composer opens, you will recognize similar icons
to those that you see in many word processors except that they're
not so confusing. My students use Composer
regularly to make web pages. Here's one to look at. Person's
Web Site.
When Composer opens, you will recognize similar icons
to those that you see in many word processors except that they're
not so confusing. My students use Composer
regularly to make web pages. Here's one to look at. Person's
Web Site.
To use Composer, open it and immediately choose the "File" and "Save As..." procedure. Save in the same folder that contains all those cool gifs and jpegs you just swiped from the net. Now look at the possibilities.
Practice all these concepts and applications. They lead to enhanced communication and learning in the educational setting. I believe that children read more sophisticated material when presented in this web page format. Your lesson material can also be more directed as you will see if you visit my Marine Biology Electronic Learning Packet. I simply used a paper packet that a colleague of mine wrote, and I turned it into a web site using these same concepts. It takes time, but it saves time, too. If you word process, you can do web authoring.
When you're finished, "Save As..." in the normal manner, and then follow these instructions to save as a web document. Go to "Save As..." and type a name in lowercase followed by a dot (period) and the letters htm (in lowercase, too). Open your file in Netscape by going to Netscape Navigator and selecting "File => Open => Page in Navigator". You'll see your page as it would appear on the web.