Many web designers will use a table to organize information
around a topic with many subtopics. The weekly sessions
for this website are an example of this use of tables. Tables can also
look similar to databases or spreadsheets without the sorting and calculating
functions. The table below is a good example of this use. This is a table
that served as an example of a database on Marine Phyla.
|
|
|
|
|
|
|
|
| Nudibranch | Mollusc Gastropod | Poda | Radula, active feeder | Nematocysts, coloring | Sexual | Swallows anemones for their nematocysts, shelless |
| Sea Star | Echinoderm | Tube feet | Tube feet, oral disk, active feeder, oral disk | Spiny skin | Sexual, regeneration of parts | Regurgitation of stomach to digest food |
Tables, however, have a much more creative side. In fact, it's a hidden side that makes web page design much more fascinating. Take a moment to experience a virtual tour of an elementary school in my district, and you'll see what I mean.
The table in the virtual tour has six rows and two columns. However, after I added the table, I made the borders invisible unlike the table you see above where the borders are easily seen. This simple idea allows us to place images almost anywhere on a web page. Visit the district office in the Pleasant Ridge School District and notice the table borders are invisible on the outside, but there is a table with visible borders inside a bigger, invisible table. Pretty dang slick, don't you think? So, how is this done? It's very simple.
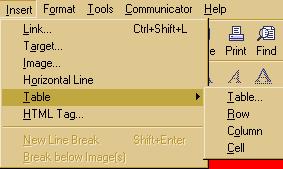
Open a new or existing page in Composer. Place the cursor on a fresh line, and center it if you like. Go to Insert => Table => Table in the menu. In the window that pops up, select the number of columns and rows you want. Enter a number in the box after "Border line width". Zero means no border. You should set the "Table width" to 75% (85% is also a good standard) of your window. You can figure out how to center, can't you? It's getting more and more intuitive as we go along.

The table below is a 3 by 3 invisible table. To give you
a frame of reference (no pun intended), I inserted a table with a border
in the middle cell and placed the "New Table Properties" window inside
it. I made the outer table (the invisible one) 85% of the screen size by
clicking in the "Table width" box. I entered 85 to indicate that
I want this table to be 85% of any screen on which it appears. I also added
the link to the top of the page (click on the mouse) and a link to "Home"
(click on the curmudgeon) just so you realize that tables can have links
in them. Pretty powerful stuff!
 |
|
||
|
|||
 |
You can edit tables, too. Place your cursor anywhere in the table. Go to "Format => Table Properties" and you get the "Table Properties" window again. Make your changes.
To select a cell, place the cursor in the cell you want to edit. Go to Format => Table Properties" and you'll see the "Table Properties" window has changed a little. You can now make changes to your individual cells. You make changes to rows or columns in the same way. Just click on the "Row" tab.

These options allow you to justify your row or column vertically and even fill a row or column with another background color.
To select an individual cell from a table, simply click inside the cell, or you can also select the text or image in the cell. Once selected, a row, column or cell can be edited.
To add rows, columns or cells, simply click inside a cell, choose "Insert => Table => Row (Column or Cell)" and you'll be delighted with the results.

Use tables to your advantage in creating web pages that
have visual and spacial appeal. For an excellent overview of design
principles in screen design, read The Non-Designer's Web Book, Chapter
6, pages 104 - 124.